Wash the post-filter
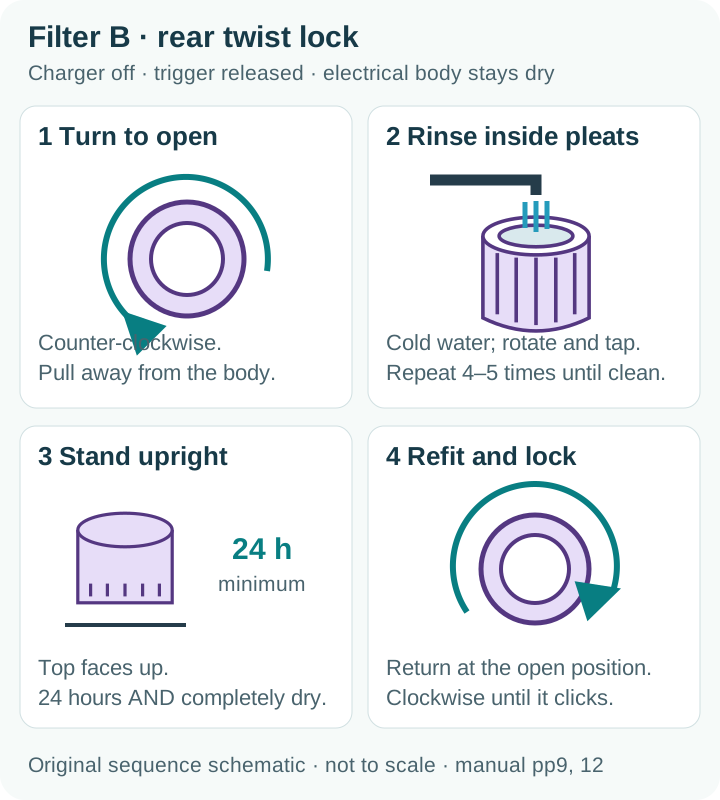
Rinse the inside pleats of twist-off Filter B, dry it upright for at least 24 hours and verify its lock before use.
Version 2.0.0. Required observations are marked *. Your answers stay in this browser.
1. Match the model and parts
Read SV10 on the machine label and compare your parts with manual 229602-01. Filter A has a small pinch handle; Filter B twists off the rear. A star-shaped top is a different version. Confirm the dry motorized head in this manual before following a brush task.
Region: US
Parts: Pinch-handle Filter A and twist-off Filter B; original dry motorized head
Not covered: V8 star pre-filter; V8 Cyclone; Soft roller / Fluffy head cleaning; V10 / V11; Modified batteries or aftermarket heads.
Choose the versions you can confirm.
Compare versions →2. Prepare
Stop for a damaged charger, burning smell, liquid exposure, a swollen or leaking battery, broken catches or an obstruction you cannot safely reach. Contact Dyson and keep the battery sealed.
Consumables and fit
| Item | Specification & fit | Do not substitute |
|---|---|---|
| Cold water | Water only; rinse the inside pleats of Filter B. Original SV10 twist-off rear Filter B | Detergent, fragrance, heat-assisted drying and a different rear-filter designp12 Washing Filter B; p9 Wash filters |
3. Follow your checks
Match the model and preparation to start.
Read all possible routes
Is the charger disconnected, the machine cool and undamaged, and your hand away from the trigger?
- Yes — Continue with the matching parts and the checks below.
- No — Stop for a damaged charger, burning smell, liquid exposure, a swollen or leaking battery, broken catches or an obstruction you cannot safely reach. Contact Dyson and keep the battery sealed.
- Not sure — Save your observations and compare the matching manual before continuing.
Does the rear Filter B turn counter-clockwise to the open position shown in this manual?
- Yes — Use the rear filter’s inside-pleat method.
- No — Match the exact filter before trying to remove it.
- Not sure — Save your observations and compare the matching manual before continuing.
Can the filter stand upright and dry fully for at least 24 hours?
- Yes — Keep both filters out of use until fully dry.
- No — Arrange the drying space and downtime before washing.
- Not sure — Save your observations and compare the matching manual before continuing.
4. Follow and record
Complete the checks before recording physical work. Follow steps in order.
Unlock the rear filter
Turn Filter B counter-clockwise to the open position and pull it away from the rear of the machine. Keep the electrical body well away from water.
Look for: The rear filter separates at its normal lock; no casing screws are involved.
Manual: p12 Washing Filter B; p9 Wash filtersWash the inside pleats
Run cold water through the inside of Filter B, rotating the filter so every pleat is rinsed. Use water only.
Look for: The exact SV10 manual specifies inside washing for Filter B.
Manual: p12 Washing Filter B; p9 Wash filtersTap and repeat
Tap the filter gently against the side of the sink to release debris. Repeat the rinse-and-tap process 4–5 times until it is clean.
Look for: Remaining debris calls for another gentle rinse; keep the pleats intact.
Manual: p12 Washing Filter B; p9 Wash filtersStand upright to dry
Stand Filter B upright with the top facing up and record the drying start. Air-dry completely for at least 24 hours, away from heat appliances and flame.
Look for: The filter stays upright and outside the machine.
Manual: p12 Washing Filter B; p9 Wash filtersCheck every pleat is dry
Once at least 24 hours have passed, check that the filter is completely dry. If moisture remains, continue air-drying and leave the confirmation unchecked.
Look for: Time alone does not permit a damp filter to be refitted.
Manual: p12 Washing Filter B; p9 Wash filtersReturn to the locked position
Return the fully dry Filter B to the open position on the machine and turn clockwise until it clicks into place. Check it is secure without forcing it.
Look for: The rear filter locks normally and has no visible damage.
Manual: p12 Washing Filter B; p9 Wash filtersCheck Filter A before use
Confirm that Filter A is also completely dry and correctly seated, and that the bin is fitted. Keep the machine stopped until the whole machine is ready; this task records Filter B care only.
Look for: A separately washed Filter A needs its own complete drying interval.
Manual: p11 Vacuuming; Washing the filters; p12 Looking for blockages
5. Keep your result
Record what you observed. A completed checklist does not certify that equipment is repaired.
When to check again
Regular filter care; check sooner after fine dust or intensive use.
Wash both filters at least once a month; more frequent washing may be needed with fine dust, intensive use or mainly Powerful suction mode.
Manufacturer guidance · p11 Washing the filtersSources & fit
- Dyson V8 SV10 operating manual, pinch filter (229602-01)p12 Washing Filter B; p9 Wash filters · Checked 2026-10-13
- Choose your Dyson V8 support: star or pinch filterV8 support selector: pinch handle versus star filter · Checked 2026-10-13
Independent, AI-assisted guidance. No physical repair trial is claimed. Manufacturer instructions for your exact version take priority.