Check automatic line feed failure
Distinguish insufficient line, crossed winding and a restricted feed lever before reassembly and a separate retest.
Version 2.0.0. Required observations are marked *. Your answers stay in this browser.
1. Match the model and parts
Remove the battery. Find LST300 and the adjacent type number on the tool label. Compare the guard, cap, spool and assembly figures with the linked LST300 manual. Use ServiceNet for your exact type if they differ. LST300 is not a bump-feed head.
Region: US
Parts: Automatic-feed head with AF-100 spool; match model and tool type to manual
Not covered: LST420 / LSTE525; GH corded models; Dual-line heads; Metal line or blades; Nonmatching tool type or modified head; Unknown tool type or missing exact-type manual; Bump-feed conversion.
Choose the versions you can confirm.
Compare versions →2. Prepare
Keep the battery removed if the exact type/manual match is unknown or parts differ from the figures. Stop for a damaged battery, exposed wiring, a faulty switch, cracked guard, broken spool/hub, damaged cap tabs or housing slots. Use an authorized service center. Never open the battery, motor housing or charger.
Consumables and fit
| Item | Specification & fit | Do not substitute |
|---|---|---|
| Factory-wound replacement spool | BLACK+DECKER AF-100; 0.065 inch (1.65 mm) round nylon monofilament Original LST300 automatic single-line head, after exact tool-type/manual match | Bump-feed or dual-line heads; metal, serrated or heavier line; unverified replacement headsEnglish p9 Cutting line / Line feeding; Replacement accessories |
| Bulk cutting line | 0.065 inch (1.65 mm) round nylon monofilament Intact original AF-100 spool with the slot, adjacent anchor hole, arrow and fill recesses in figs P–R | Serrated, square, heavier or metal line; different anchor geometryEnglish p10 Rewinding spool from bulk line; figs P–R |
3. Follow your checks
Match the model and preparation to start.
Read all possible routes
Is the battery removed, the trigger released and the cutting head stopped, with no battery damage, exposed wiring or faulty switch?
- Yes — Keep the battery removed for every hands-on step.
- No — Stop using the tool for electrical, battery or switch damage. If you have only omitted battery removal, make the tool safe before restarting.
- Not sure — Keep the battery removed. Save your preparation record and check the matching manual before continuing.
Have you matched the label LST300 AND its exact tool type to the official lookup manual and its figures, with the original AF-100 automatic single-line head?
- Yes — Record the label type and matching manual reference in the first step.
- No — An unknown type, unavailable type manual, different figures, bump-feed head or dual-line conversion blocks this procedure. Use manufacturer support to identify the correct instructions.
- Not sure — Keep the battery removed. Save your preparation record and check the matching manual before continuing.
Was the observed problem failure to advance line on the original automatic-feed head?
- Yes — Never bump this head to attempt a feed.
- No — Use the slow-running or cap-latch task for those different symptoms.
- Not sure — Keep the battery removed. Save your preparation record and check the matching manual before continuing.
Are the cap, guard and housing intact and the remaining line the specified round nylon?
- Yes — Check remaining line and the winding first.
- No — Damaged parts require service; verify an unknown line specification before continuing.
- Not sure — Keep the battery removed. Save your preparation record and check the matching manual before continuing.
4. Follow and record
Complete the checks before recording physical work. Follow steps in order.
Record the exact tool and make it safe
Release the trigger, let the head stop, engage the lock-off and remove the battery. Leave it removed throughout hands-on care. Keep fingers away from the sharp cutter on the guard. Read LST300 and the tool type from the label. Open the official model/type lookup and compare its manual and parts figures with your actual guard, single-line head and AF-100 spool. A readable model name alone does not establish the type. If the exact type manual cannot be obtained, or any figure differs, save a preparation record and stop.
Look for: The battery is physically separate from the tool; your label type and matching manual reference are written below.
Manual: Official model/type lookup instructions; type is beside or below the model numberOpen and record the line condition
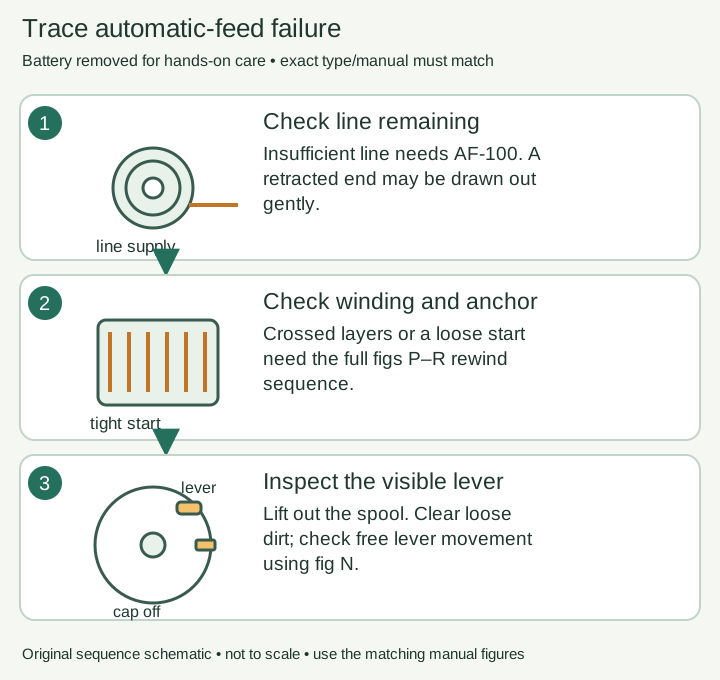
Release the cap tabs and remove the cap with the battery out. Note whether line remains on the spool, is crossed or knotted, or has retracted inside the eyelet. Do not pull hard against a jam.
Look for: You have recorded what is visible before changing the winding.
Manual: English pp10–11 Automatic line feed does not work; figs N, Q, RChoose the supply remedy
If too little usable line remains, fit a compatible AF-100 using the spool task. If adequate line remains, pull it gently to approximately 5-3/8 inches (136 mm). Stop pulling if it binds; lift out the spool for inspection.
Look for: There is enough compatible line, or a replacement task has been identified.
Manual: English pp10–11 Automatic line feed does not work; figs N, Q, RCheck winding and its anchor
Look for crossed layers and check that the beginning of the line is held tight against the spool as fig Q shows. Correct a hand-wound spool only with the full figs P–R rewind sequence, or use factory-wound AF-100.
Look for: Line layers do not cross and the anchor is tight; no generic anchor method is substituted.
Manual: English pp10–11 Automatic line feed does not work; figs N, Q, RCheck the exposed feed lever
With the spool removed, carefully clear loose grass and dirt from the housing. Check that the lever can move freely without force and matches fig N. Do not remove the lever for cleaning, add lubricant or open the motor.
Look for: The lever moves freely and is in its pictured position; stiffness or damage is recorded for service.
Manual: English pp10–11 Automatic line feed does not work; figs N, Q, RRefit and limit the line
Route the single line through the eyelet, seat the spool on its boss and latch both cap tabs. Shorten any nylon that extends past the guard cutter so it just reaches the cutter.
Look for: The cap is secure, line path is clear and the line is not overlong.
Manual: English pp9–10 Replacing the spool; figs M–OSave the cause found and next check
Record which condition you corrected. Use Verify the trimmer after maintenance for a normal-use test. If feeding still fails after correct winding and cleaning, stop and contact service with this record.
Look for: An observed feed result is kept separate from the unpowered repair checks.
Manual: English pp10–11 Automatic line feed does not work; figs N, Q, R
5. Keep your result
Record what you observed. A completed checklist does not certify that equipment is repaired.
When to check again
Automatic feed fails or the spool jams
Inspect when the stated condition occurs. The manual gives no fixed day or month interval.
Manufacturer guidance · English pp10–11 Automatic line feed does not work; figs N, Q, RSources & fit
- BLACK+DECKER LST300 instruction manual (manufacturer document, retailer-hosted)English pp10–11 Automatic line feed does not work; figs N, Q, R · Checked 2026-10-13
- BLACK+DECKER: locate a manual using model and type numberOfficial model/type lookup instructions; type is beside or below the model number · Checked 2026-10-13
- BLACK+DECKER LST300 product and supportLST300 model identity; Automatic Feed Spool; Includes AF-100 · Checked 2026-10-13
Independent, AI-assisted guidance. No physical repair trial is claimed. Manufacturer instructions for your exact version take priority.